There are some important best practices to help ensure that your applications for construction adhesives for a tilt-up project will deliver optimum performance and results.
First of all, when it comes to adhesives in general, a fundamental rule of thumb is that the bond you make will only be as good as the surfaces you are bonding. Low-quality materials can lead to poor adhesive performance. Warped materials can affect bond strength as well. So make sure there’s a match between the adhesive you’re using and the characteristics of those materials.
Also, wait an appropriate amount of time (flash time) before placing the materials together to achieve an effective bond. And lastly, more is NOT always better! In general, using the minimal amount of adhesive to do the job is the way to go.
For tilt-up construction projects, here are some additional tips:
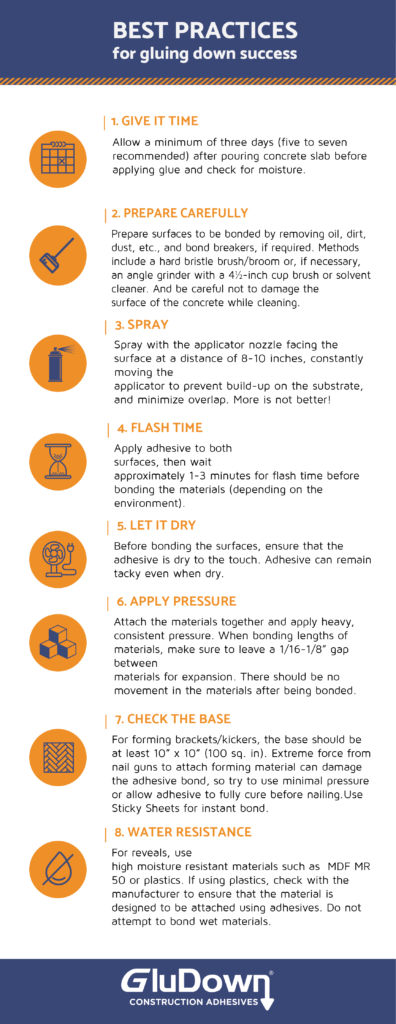
- Allow a minimum of three days (five to seven recommended) after pouring concrete slab before applying glue and check for moisture.
- Prepare surfaces to be bonded by removing oil, dirt, dust, etc., and bond breakers, if required. Methods include a hard bristle brush/broom or, if necessary, an angle grinder with a 4½-inch cup brush or solvent cleaner. And be careful not to damage the surface of the concrete while cleaning.
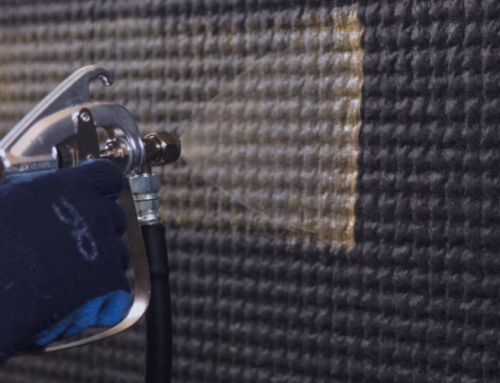
- Spray with the applicator nozzle facing the surface at a distance of 8-10 inches, constantly moving the applicator to prevent build-up on the substrate, and minimize overlap. Again, more is not better!
- Apply adhesive to both surfaces, then wait approximately 1-3 minutes for flash time before bonding the materials (depending on the environment).
- Before bonding the surfaces, ensure that the adhesive is dry to the touch. Adhesive can remain tacky even when dry.
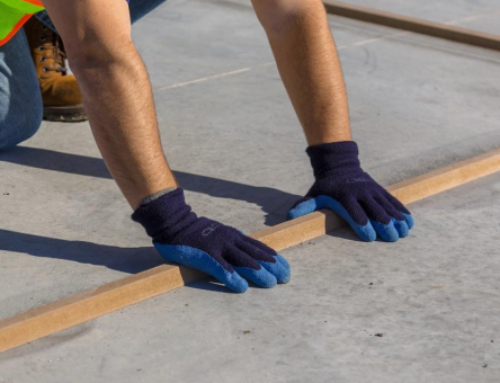
- Attach the materials together and apply heavy, consistent pressure. When bonding lengths of materials, make sure to leave a 1/16-1/8” gap between materials for expansion. There should be no movement in the materials after being bonded.
- For forming brackets/kickers, the base should be at least 10” x 10” (100 sq. in). Extreme force from nail guns to attach forming material can damage the adhesive bond, so try to use minimal pressure or allow adhesive to fully cure before nailing.
- For reveals, use high-moisture-resistant materials such as MDF MR 50 or plastics. If using plastics, check with the manufacturer to ensure that the material is designed to be attached using adhesives.
Environmental and seasonal considerations can make or break an effective adhesive application. In summer and high heat, we recommend bonding materials in the morning hours while it’s cool. In cold conditions, we recommend 40° F as the lowest application temperature.
When it rains, if possible, cover the bonded materials with plastic sheets before rain arrives. If the materials do get wet, allow two days for drying before working around or on bonded materials. And don’t spray adhesive into standing water or on damp slabs. Do not attempt to bond wet materials.
The final step is handling any clean-up that may be necessary. A traditional method is to wait until the overall job is finished, since additional wear helps reduce adhesive bond to the slab. Then scrape up any excess with a flat-edged tool. If necessary, a solvent or citrus-based cleaner can be applied and should be allowed to sit on the adhesive for 1-5 min. before scraping. Another approach that offers time and labor savings is a combination of water and a trowel brush such as the Wagman Revolution rotary system.
Many of these practices are just good common sense. If you approach the use of construction adhesives with the same professionalism as the rest of the project, you’ll be in great shape.